
How To Setup Cpanel Emails
When getting website hosting there are many times it will have a Cpanel dashboard. The hosting company will often allow at least a few if not unlimited email addresses as well. If you have gotten a cpanel hosting account and are trying to figure out how to actually setup and use those emails this will be a quick and easy tutorial on how to do just that. The full tutorial is in the video above. Below are the steps, with images, on how to create those emails as well.
There are a few drawbacks to Cpanel emails. In Cpanel not only can you create those email addresses but you can also send and receive emails from there. The interface for email within Cpanel does have many of the basic features many people would want and use every day, but it definitely is no Gmail or Office 365. In another blog post we will also be showing a tutorial on how to send and receive these emails within Gmail so you can have all your emails in one place and be able to use all the features of Gmail. They also don’t seem to have as good of deliverability out of the box you want to make sure SPF is working correctly and that you can setup DMARC as that will help with emails getting from you to the other email address. Cpanel emails seem to have a little bit slower time to receive than say Gmail. It uses your own hosting server and then the spam service through the server so it may take a minute or two for it to come through.
Lets get onto the tutorial.
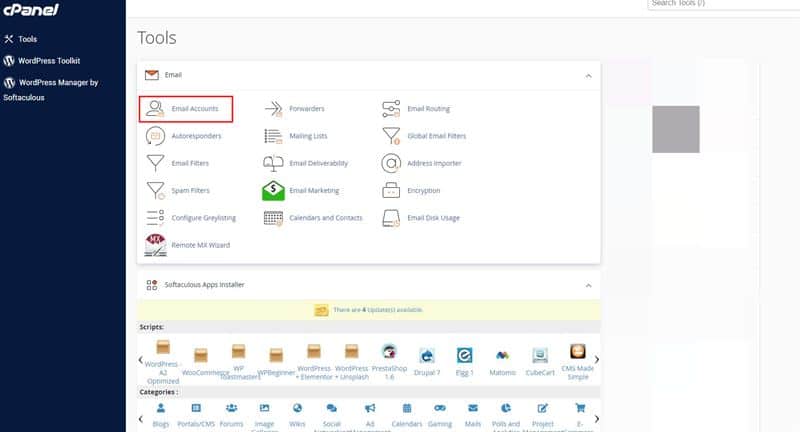
1. Login to your Cpanel dashboard for the website you would like to setup the email for. On the right side that I have blurred out you may also see some server information and statistics under that I show one called email accounts and it will show how many emails you have created and how many you are allowed so something like 0/5 if you have created 0 emails and you have 5 allowed. If it says something like 5/∞ that means you have made 5 and can make an unlimited amount of emails addresses. When you get there find the icon that is titled Email Accounts. Click on that link.
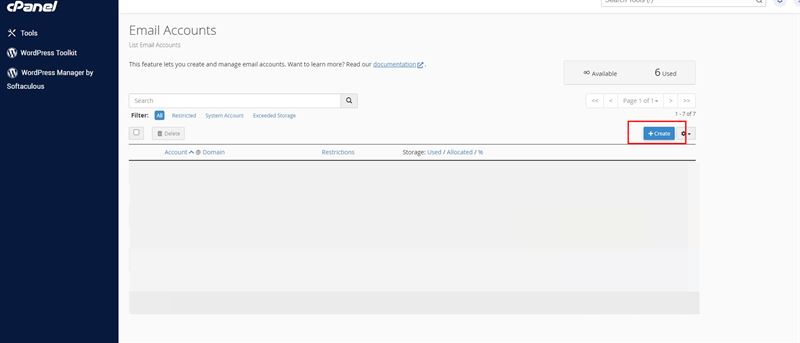
2. You will then come to a page that will list all email accounts. I have blurred them out on mine. If there are none on the account usually it will have one line showing just the username of the account but it wont have an actual email address. To add a new email just press the create button.
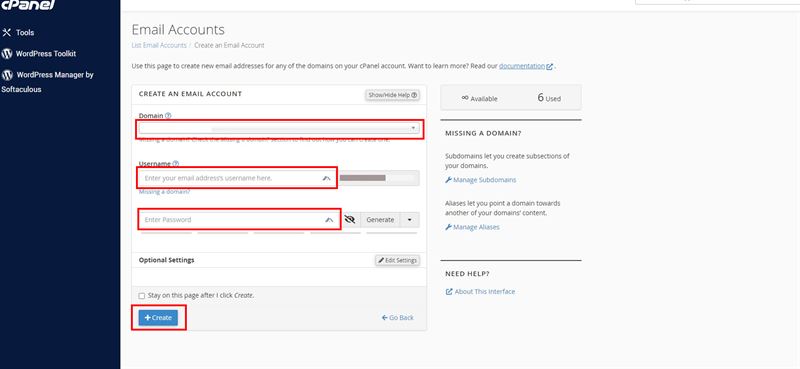
3. You will be taken to the create email account page. There are 3 things that need to be done and some optional settings. First make sure that you have chosen the correct domain url. If you have add-on accounts that are different URLs you may have some different ones to choose from, though if you have only one website on the hosting it should automatically show the main url.
You will then make the username what you want for the email. If your URL is goodstuff.com and you want your email to be admin@goodstuff.com you will want to just put admin in the username box as the url will already have been chosen in the first box.
In the third box you will type in the password you would like to use to get into your email or connect it to other services and mail clients.
There is an optional settings button. In here the only thing I would probably change is how much server space to allocate to this email. Mine is defaulted to 250mb though I usually change it to unlimited and then just routinely clean out the email.
At this point you then just press the + Create button and your email will be created.
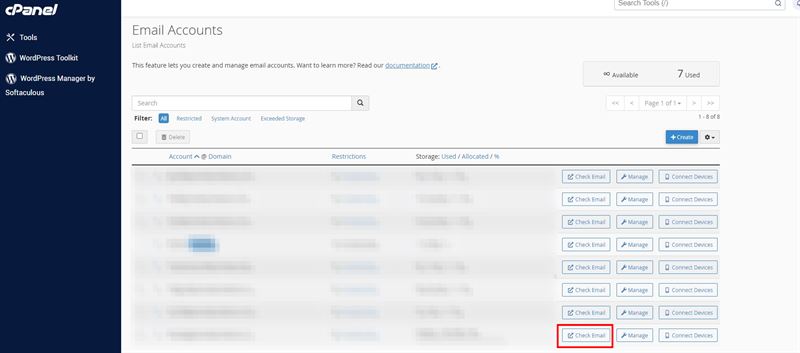
4. You will then be taken back to the email accounts page. Find the new email you created which should be at the bottom of the list. On the right there will be three boxes. The first will be to actually check your email so you can actually use it. If you are using the standard email client within Cpanel you can just press this to get to your email to send and see your emails.
The second button is manage. You will then get to a page that allows you to change password, change allocation of space for the email and a few other things.
The last button is connect Devices and this will give you the information to be able to use a different mail client or some other service like WP Mail SMTP for your WordPress site. The way I use my email the most is within Gmail so I need the information to connect it. Here is a post on how to setup your Cpanel emails to be used inside Gmail.
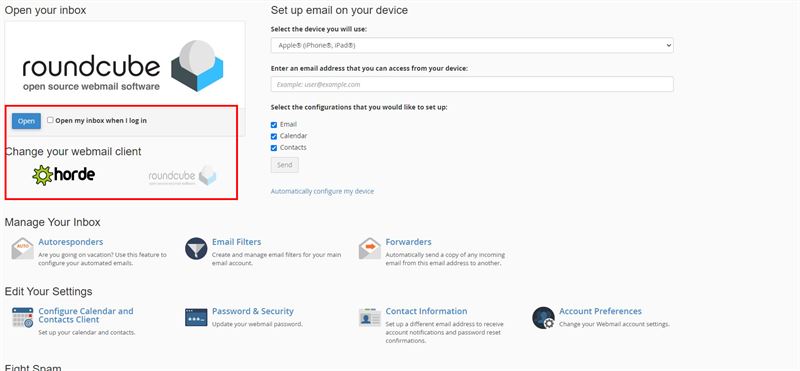
5. In this screen you will be able to get to the area to actually use your email. I usually use Roundcube, but you can also use Horde. Just choose one and press open and you will be able to use your email. If you want it to automatically go to Roundcube or Horde every time you press check email then just check the box that says “Open my inbox when I log in”.
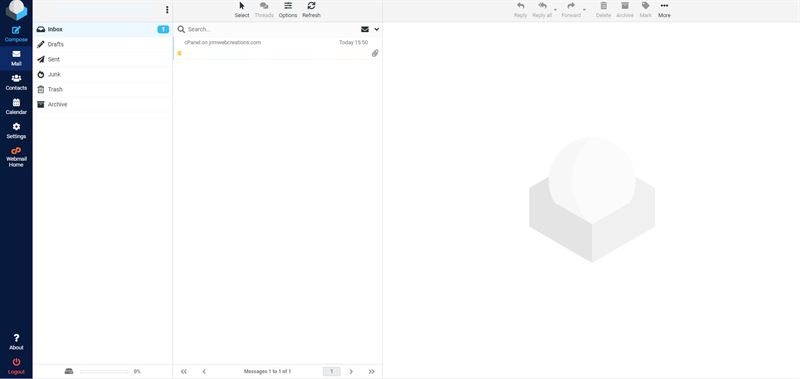
6. Now you will be able to send and receive emails in an interface that works decently well and has some pretty basic features. Send your first email and send an email to your new email address to make sure it all works and you are good to go.
Creating Cpanel emails is quite easy and should only take a few minutes. I hope this tutorial was helpful and if you want to learn how to connect your cpanel emails to Gmail to be able to send and receive in that mail client see our other tutorial. Good luck using Cpanel!


0 Comments