
WordPress Custom Post Types and Why Should You Use Them?
What is a WordPress post type and how do custom post types differ?
As a WordPress website designer, knowing the ins and outs of WordPress is very important and will save you tons of time in building websites and making sites that are easy for your customers to add information to. Understanding the actual structure of WordPress will help you understand how things work together within the WordPress CMS. Just a short bit of history will help understand what a post type is and what a custom post type is.
When WordPress was first released in 2003, it was mainly made as a blogging platform and not as much of business website or an ecommerce website platform. Being that it was a blogging platform it shouldn’t come as a surprise that the content on it was called posts. The platform then had different post types that can do different things and some have been added over the years. It may seem strange that the things called pages are also considered a post type of page, but this has stuck from the beginning. In the website database the post types will be stored in the wp_posts table. Now with the understanding of a post type here are the default post types on every new WordPress site.
- Posts – These are normally for blog posts and may use things like categories and tags for filtering and will usually show as newest post first.
- Pages – These are more specialized post types. They usually don’t have categories or tags and are usually you main pages like home, about, contact, etc.
- Attachments – This can usually be things that are added to the site like your media that may be images, pdfs and the like.
- Revisions – This post type is what allows for history of changes on the site and in other post types to be saved. They allow older changes to be restored and overwrite mistakes.
- Navigation Menus – This is mainly links to places on your site. They are often used in headers and footers. WordPress has a full system for editing the menu structure on your site.
- Custom CSS – This is quite specific and is just the place where the Additional CSS in the customizer is stored.
- Changesets – This is like the revision post type but only for the customizer.
So what are Custom Post Types?
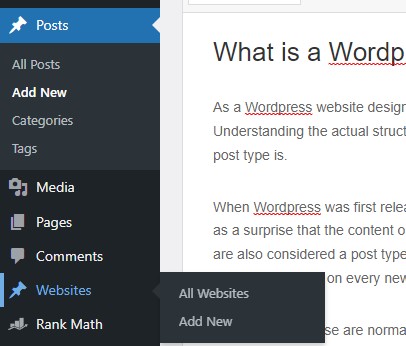
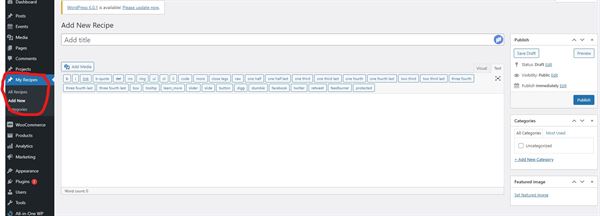
Like it’s name conveys custom post types are just extra post types that are not the default ones. WordPress added the ability to have custom post types in 2005, so they have been around for quite a long time. These custom post types may be created by the theme, child themes, plugins, custom post type plugins and by code within the functions.php or just within a plugin you create. Though you normally see custom post types everytime you open your wordpress dashboard, you probably don’t even realize that they are custom post types. Many times plugins that you install will create a custom post type and show it on the left side of your dashboard and it may have the name of the plugin or something else. A great example of a custom post type created by a plugin would be a testimonial type plugin. The plugin will normally create a testimonial post type that will let the user quickly add a new testimonial with custom fields like a name, title, description, etc and will be just like adding a new blog post. Here is an image of a custom post type I use on the site we are on JnM Web Creations.
On this site if you go to the Our Creations page all the finished websites are each added separately as new posts within websites. This allows me to have all the website pages easily have the same structure and easily be able to show the list of websites on the page.
Why are Custom Post Types valuable?
When I started working with WordPress and even selling websites for clients I didn’t know what custom post types were, how they could benefit me and my clients or even how to make them. It was probably over 2-3 years of building sites for clients that I even learned about these. As I learned what custom post types were and how they worked, it not only blew my mind at how powerful they were but it also allowed customers to be able to make changes easier to content that may be changed often like employees or portfolios.
As I had talked about with my websites custom post type I was able to quickly add a new website I had finished and the pages would all be uniform and I could easily list them on the Our Creations page. It works amazingly well for types of content that need to be uniform and need to be listed the same every time. Things that work well with custom post types are testimonials, projects, employee or our team lists, services listings, and a plethora of other types of content and information.
Though we haven’t talked about it having custom fields within the custom post type will even further open the possibilities and I usually always use custom fields as well. Custom fields just allows new fields instead of just the post editor and something like a featured image. You can now add another line for say employee name, title, duties, etc. We will get more into this in a future blog post.
When you first learn about custom post types they definitely can be something that seems very complicated, but having some patience and really learning how they work can be extremely beneficial especially to a web developer or web designer.
How do you add Custom Post Types?
There really are two ways to add the custom post type yourself. The first way is to use code and manually register them in your functions.php or a plugin, but my much preferred way to add custom post types is to use a plugin.
Though I know this is likely to overwhelm many who are beginners with WordPress here is essentially what the code to register a custom post type can look like. This is more just to show you how it can be done though if it is just too overwhelming there will be much easier ways below. So keep reading.
function my_custom_post_type() {
  $labels = array(
    'name'               => _x( 'Websites', 'post type general name','website' ),
    'singular_name'      => _x( 'Website', 'post type singular name','website' ),
    'add_new'            => _x( 'Add New', 'website' ),
    'add_new_item'       => __( 'Add New Website','website' ),
    'edit_item'          => __( 'Edit Website','website' ),
    'new_item'           => __( 'New Website','website' ),
    'all_items'          => __( 'All Websites','website' ),
    'view_item'          => __( 'View Website','website' ),
    'search_items'       => __( 'Search Websites','website' ),
    'not_found'          => __( 'No Websites found','website' ),
    'not_found_in_trash' => __( 'No Websites found in the Trash','website' ),
    'parent_item_colon'  => ’,
    'menu_name'          => 'Websites'
  );
  $args = array(
    'labels'        => $labels,
    'description'   => 'Websites Custom Post Type',
    'public'        => true,
    'menu_position' => 10,
    'supports'      => array( 'title', 'editor', 'thumbnail', 'excerpt', 'comments' ),
    'has_archive'   => true,
  );
  register_post_type( 'website', $args );
}
add_action( 'init', 'my_custom_post_type' );
Above is essentially what adding a custom post type by code would look like. Many of these things are more for the admin menu in WordPress, what it says, where it is located and some naming. The args area of the code is more the functionality of it but we won’t go into that. There actually are more things that can be added, but you would have to have a thorough understanding of custom post types to really use other stuff. There may be a few reasons you may want to code it that I can think of and here they are. Maybe you don’t want to add another plugin to your site or maybe you are actually building a plugin that you must use a custom post type with and thus you would have to code it into the plugin as it would have to work on it’s own without relying on another plugin.
Here is a step by step guide to adding a custom post type with the Custom Post Type UI plugin.
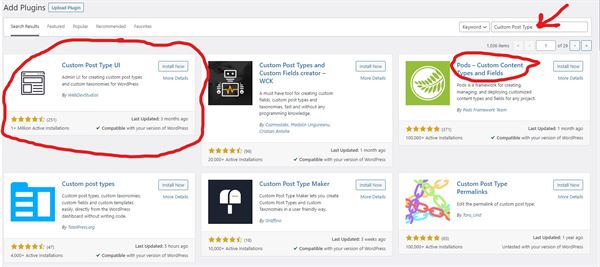
1. Goto Plugins on the WordPress dashboard and add new. Find the Custom Post Type UI (this is what we are using for this example), Pods or other Custom Post Type plugin you think looks good. Press install now and activate.
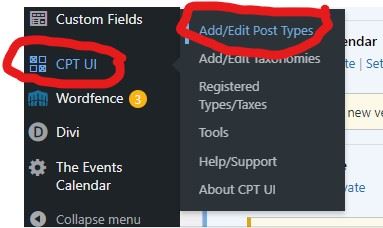
2. Goto the CPT item on the left of the WordPress Dashboard and then to Add/Edit Post Types and click on that option.
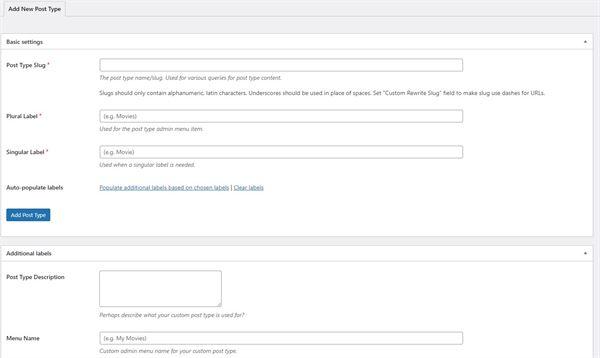
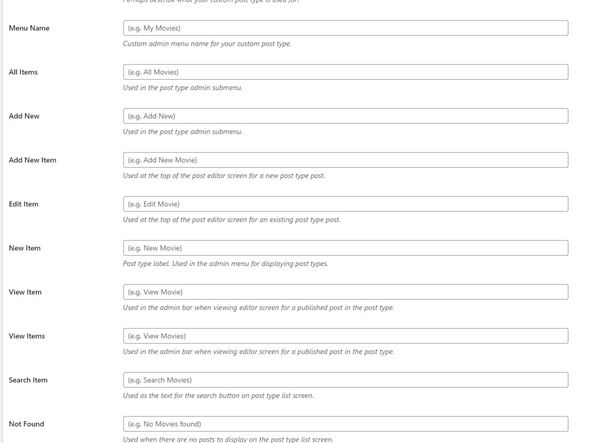
3. Start filling in the information that it gives you options to fill in. If you are using this for Recipes you might type in recipe for the slug and then each one essentially has examples. So Plural label would be recipes, and Menu Name might be My Recipes.
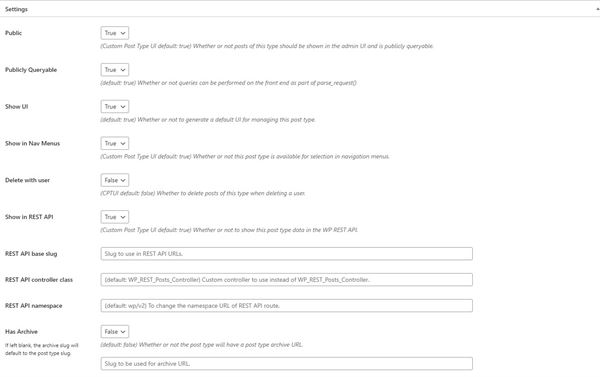
4. After you have filled out that info or the things you want in there then it will go down to settings. Until you really understand these you may want to leave these mostly the same except for a few things to note.
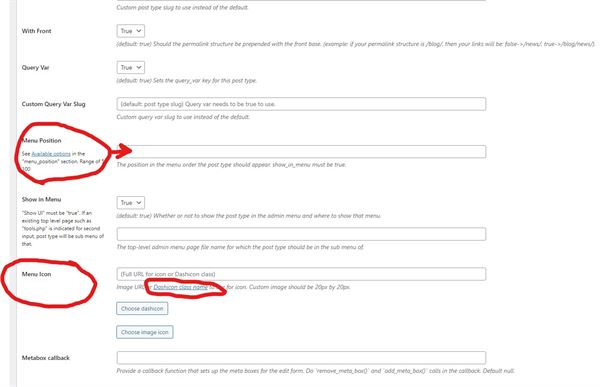
You can change where your custom post type sits in the dashboard. There is a link to show you what number to insert to have it show in a certain area. If you leave it blank it will be right before the Appearance link normally. You can also change the icon that is to the left of the link. If you leave that blank it will just show the tack like Posts does.
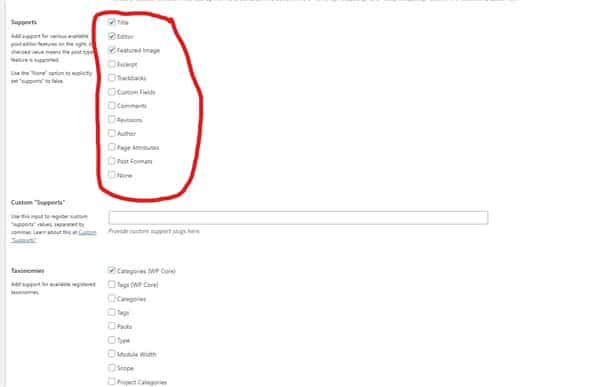
You can also specify what type of content can be added to these post types. This is where custom fields come in amazingly valuable. Then press save and your custom post type has been created.
5. Use your custom post type as needed. The uses really are limitless.
The process really isn’t hard to show through these images, but the value of custom post types is hard to quickly explain. Definitely take a look at the video for more information on how to use them and how to make the pages look good. Hint: If you use the Divi Theme then use the Divi Theme Builder to edit the custom post pages just as you might your blog post so you can have a template for all pages.
I know custom post types can really be something tough to wrap your head around and took me a while to fully understand, but once you do they are extremely valuable.


0 Comments